Showing posts with label Garden design. Show all posts

Sunday, September 26, 2021

A Long Suffering Project

 A few weeks ago, Shawn brought up "the hideous bed." Again. I call it "the hideous bed," not because it's hideous, or even a bed, but because Diana's husband called one of her flower beds right after she finished it "hideous" and never changed his mind, and thus "hideous bed" is now a catch-all for anything in the yard that the non-gardener/landscaper hates. Even if it is a half-finished project.


This is a "half finished project" because I originally was going to remove the rock, backfill with soil, and landscape. Unfortunately, as soon as I removed some of the rock (to use for 2 other yard projects), I realized that the area was actually graded in a way to direct runoff away from the house, so backfilling with soil was immediately out, but I was also too lazy to go get more rock, and I also wasn't sure if I wanted to try to do some sort of french drain system.  

So, while he was off on his boy's trip (mountain biking in Colorado), I decided to finally DO something about the half finished hideous bed.

Instead of getting more limestone piece like we've already got, I decided to change it up with some "shadow stone" instead. I went with angular rock just so it compacts together and provides a more stable walking medium.  Now it's officially "done" but I'm still debating on putting something in the center area - like the birdbath or the bird statue. 

Of course, now I'm also all about redoing the area between this spot and the house - removing all the plants (liriope and rough leaf dogwood) and starting over - maybe with a Rusty Blackhaw and Inland Sea Oats or Columbine


Monday, April 19, 2021

Big Freeze Clean Up: Before and After

So I left off with the big freeze having happened. This means that plants got goobered.  Plants that hadn't been cut back in eons died back to the ground, some plants, like my Arizona Ash still haven't recovered since it was already budding out right as the freeze hit. 

The Asiatic Jasmine corner. Before. On the plus side, the freeze really did kill off most of this invasive plant making it much easier to get rid of.


After.  I realize it's hard to see the difference since it was all brown before and is still brown. But hopefully the tree appreciates it.


Can you find all the toads?  There was a whole family of them living under an old grill cover which was in the Asiatic Jasmine.  The cover had been full incorporated into the jasmine. 


The Toadrys.  I had to text my "snake guy" coworker because he's into all the cool animals - like seriously, I've brought him skulls, jaw bones, snake skins, and pictures of snakes in the past to find out what they are. So naturally I texted him a photo of the toads and was like "uh...I'm doing yardwork, how do I save these guys? Do I need to use gloves or anything?" So this was the first time in my life where I went about catching toads and putting them in a bucket.


"Hey! Where do you think you're going, mister?!". The amount of talking I was doing to those toads and the spiders I found probably had my neighbors questioning my sanity.


Adult Rough Earth Snake. We have these occasionally in the yard and I love them. This was my first time actually catching and holding one. And then I had to catch him AGAIN because he was intent on needing to be in the part of the yard where the asiatic jasmine was and didn't WANT to be in the garden area.  Bonus points to me that I didn't need to contact "the snake guy" since I joined a snake identification group on Facebook and now spend a lot of time looking at snake pictures and have gotten much better at identifying them - Shawn says hopefully this means I'll actually SEE the snakes before I step on them (I've almost stepped on a racer, a bull snake, a rattlesnake, and a rat snake).

As for planting things in this area, I'm trying to generally keep it unplanted through this summer (because I predict it's going to be a summer from hell a la 2011 again). BUT, this is also an area that like years ago I had planned to plant some beauty bushes in this area - bushes that I promptly had purchased with the misguided idea that if I had the bushes on hand, I'd remove the asiatic jasmine sooner rather than later. 

Hahahahahahahaha

Yeah - the beautyberry, Mexican buckeye, and agarita sat in tiny pots for YEARS. I needed to cut the containers away from the roots and still dig them out of the ground.  BUT! I did get them dug up and then replanted in this area. But since those plants were also damaged by the freeze, they all got a severe cut back and now I'm waiting for them to leaf out more so you can actually see them in the photo. But with the warmer weather, I am getting some of the Asiatic jasmine coming back from root pieces I missed, so I need to keep the area clear for a growing season or so, just to make sure I got it all.

Friday, May 10, 2013

More Mull-shay!


The new "Betony Bed."  Betony, White Yarrow, Paprika Yarrow, Liriope, Columbine and Firespike.
After using 3 bags to mulch the possumhaw area, and then another 2.5 to mulch the red tip photinia bed, I decided that paying at least $2.50 a bag and having all those bags was a little ridiculous.  Enter The Natural Gardener.  The Natural Gardener sells mulch and soils in bulk.  Their most expensive mulch (Sylvan Formula) is currently $26 per half cubic yard (aka 13.5 cubic feet) with the cheapest one that you'd want to use being $16.50.  If you don't want half a cubic yard, they also sell it in "bag it yourself" bags.  If you go this route, however, the cost does increase to $3.50/bag ($35.50/half yard).  Does buying in bulk end up saving money?  Yes - but it's a negligible amount ($2.44 per big box brand bag equivalent instead of $2.50 (going for the cheap stuff on both accounts)).  So because we were tired of ripping apart bags, we opted to go get us some bulk mulch.  It was easy-peasy.  The guy loading the mulch was a pro - we didn't even have to get out of the truck AND he even levelled the top of the mulch mountain all with the little front-end loader.  We took surface roads all the way back home because mulch does get blown around.  We had the sunroof open, and we both ended up covered in mulch dust by the time we got home.
The side yard - Iris bed on the right in front of the rain barrel, Bettony bed straight back.

Do you have any idea how quickly half a yard of mulch will disappear when you're spreading it around the yard?  Like super quick, man.  We mulched the Rose bed, the Iris bed, and the new Betony bed.  And that used about half of the mulch.  We still have to mulch the front bed, 3 trees, and the main backyard bed.  Plus we may do the veggie garden beds (even though what I really need is more soil), and the front bed along the walk.
The Rose Bed - Dr. Huey Rose with Blackfoot Daisy, Zexmenia, and Dwarf Lion's Tail.  The zexmenia reseeded prolifically this year.

I think we're going to need more mulch.

Saturday, April 27, 2013

Mull-shay

The original plan, back in the day, was to mulch the ever-loving-shit out of everything.  But I am lazy, and life happened, and Shawn said that he wanted to get rid of some of the grass; not all of it.  All this to say that we (meaning I) never did mulch the plants I planted in the fall.

Because Shawn is the one that gets to mow the yard, he had been attempting to mow in between and around the possumhaws (as well as the ornamental grasses, and around the cedar elm tree).  It wasn't going so well - or rather, it was going fine, it was just a pain in the ass.  He said as such and practically begged me to allow him to remove the grass in those areas.  Naturally I agreed.

And so it came to pass that on the 13th we (meaning we) spent the day pulling up grass, spreading compost and leaf litter, laying down newspapers, watering said newspapers, and then spreading 3 bags of mulch in the area around the possumhaws.  We totally planned on doing the other areas too, but as I said, life got in the way. 

The plan for tomorrow is to dig out more grass, lay more newspaper and spread more mulch (assuming we can find a place open where we can get a truckload of it - it makes little to no sense to purchase bags of the stuff when we can, and will, end up using more like a cubic yard of it).

Yay! Mulch!

It should be noted that we spread the mulch on the 13th or so (2 weeks ago).  I spent this morning digging up that damned nut sedge out of this area.  It's annoying stuff, and after you read This Article, you'll understand why (ifin you don't already have experience with it).

Monday, March 18, 2013

Phase 9 of eleventy - billion

Phase 9 - put the rain barrel on cinder blocks and create the planting bed at the base. 

Of course the planting bed became more of a drainage project when we figured out that the rain barrel could only really be set up with the overflow port on the side that faced uphill. 

Of course, I saw this overflow conundrum, and I said "I just need to dig out a little ditch and everything will be hunky dory."  But then I back filled with loose dirt.  This of course didn't work out very well during the rainstorm we had - the dirt got pushed out of way at the bottom of the cement drain guide and then just flowed directly to the cinder blocks.  So I knew it had to be fixed - and of course this is all dumb because while I was backfilling with dirt I thought to myself "oh this isn't going to work out well... I should really back fill with rock."  And lo, the woman, she is brilliant.

So this last weekend, I re-dug out the area by the plants I had planted, and then made a much more defined drainage ditch and backfilled everything with rocks instead of dirt.  You read that right.  Me.  Not the husband and me.  Just me.  This is because he claims that if I had left the grass alone it would have been fine and I was making a mountain out of a molehill, why do I have to go redoing the perfectly adequate yard, yada, yada, yada.  Of course it didn't help matters that to do this part, I cannibalized the rock bed at the other end of the yard.  It's in my plan, but apparently the husband is incapable of reading a plan.  And thus he promptly fuh-reaked out when he came out after I was done hauling rock back and forth.

My yard - my own personal "Hideous Bed."

   
From the front

From the side - the drainage ditch makes a V shape so it waters the plants I have planted in the rocks (Brazos Penstemon, Blue Penstemon, and Hummingbird plant).

Friday, February 22, 2013

Garden Design Implementation: Phases 7 and 8 of eleventy-billion


Phase 7:  I don't know if it was the impending dinner party, the brush pick up, or the fact that he squashed my dreams of a cinder block wall, but while I was at Pam's Lawn Gone talk at the Natural Gardener, the husband set up my secondary rain barrel.  This rain barrel has been sitting in the yard not set up and not collecting water since my friends gave it to me when they moved in April.  As you can see, he used the cinder blocks as a stand since more head equals better draining of water from the barrel.


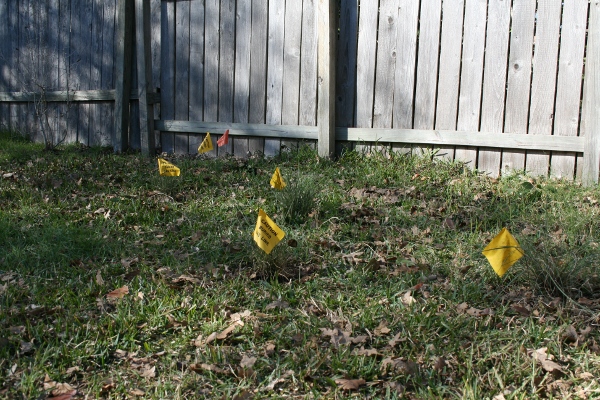
Phase 8:  The planting of the grasses.  My original Plan called for two Big Muhly grasses, and when the husband nixed the cinder block wall, I added a third.  Since I decided that wouldn't give enough screening, I decided to add three Gulf Coast Muhlies to the mix as well.  Of course I don't think this will be tall enough to totally shield the utility box, but it's a start.  Of course you can't see green on green grasses, so I'll help you out - the yellow flags are the grasses and the one lone orange flag in the back is a coral honeysuckle vine.  The flags, naturally, are meant to keep the husband from accidentally mowing over them.  I purchased one of the big muhly grasses back during the fall Wildflower Center sale, I got one from my coworker, and I purchased the third at Barton Springs Nursery the day of the talk (yes, I totally visited two of our awesome locally owned nurseries on Saturday).  I got the two gulf muhlies at the Natural Gardener. The coral honeysuckle also came from BSN.  Not shown:  The Augusta Duelberg sage and 2 Ruby Crystals  grasses I also got at BSN.

All that's left on this side of the yard is to plant the Hamelia Patens aka Firebush next to the rain barrel (I use the scientific name because the plant is sometimes called hummingbird bush, but there are a bunch of other plants also called hummingbird bush).  I may also replant more petunia as my current plan calls for having it moved all to this side of the yard (but I may wait until the fall to move the rest).

Sunday, February 10, 2013

Garden Design Implementation: Phases 3 - 6 of Eleventy - Billion

NOTE:  I call it "Eleventy - Billion" because it makes Roberta happy.  She's not a numbers person, so I'm not sure how she's so sure that such a made up number is, in fact, accurate.

Welcome back to my backyard - where I have a plan, but the husband decides the plan is lacking.

In case you don't follow me on the facebooks, a few weekends ago I went out and purchased 6 cinder blocks.  I figured 6 was a good number to start with.  You'll remember that my plans called for a cinder block succulent wall.  My husband, however, did not remember this little detail.  My husband does not like cinder block walls (even after I showed him Pam's pictures of her wall).  He also does not like galvanized steel stock tank planters/ponds.  I have since decided that he is a weirdo.  This also means that I have to change my plans for what to do in my little rock patio area (not to mention figure out what type of planters to get for my herb garden thing I want to do). Also, this leaves a hole in my plans of what to do about screening the utility box.  He's all for building something out of wood, which I'd rather not do...so I may end up just planting some tall grasses, throw in a bottle tree, and call it good. (watch, he probably doesn't like bottle trees either [edited: He does not like bottle trees...found that out this afternoon.  Lesson: I like modern, he likes manor style classic - so be glad I have any plants.])

Anyhow, back to the story at hand - I came traipsing home with 6 cinder blocks, 4 of which I immediately lined up in the rough location of said wall.  The husband was not amused.  In the end, I used 2 cinder blocks to create a step down from the deck; the other 4 are in their original location, but are now covered with pruned tree limbs so we can't see them.  And if my husband can't see something, it doesn't exist.  The problem with the step I made is that it's still a bit of a big step to get from the deck to the step and vice versa, so I may have to put two of the remaining cinder blocks on their ends to make a two-step system.  The other two will be used to elevate one of our rain barrels. (Again, my plan was to raise both of the rain barrels, but that, apparently, is too much work and so we will only raise one of them.  Maybe.  I think the husband is talking himself out of it because it requires cutting a down-spout and breaking rivets or some such)
It ain't pretty, but it's functional.  And for now, that's all I need.

Phase 4 was planting Dianella along the side of the deck - if the plants don't make it (due to lack of water or otherwise), I'll just have to find different plants to plant.
A zoomed out photo

Close(r) up of the dianella plants at the deck.


Phase 5 was moving all of the Mexican Petunia from the shady side of the yard to the more sunny side of the yard.  That went well.  I haven't moved two clumps yet (the ones by the humming bird feeder), mostly because I couldn't remember off the top of my head if they were supposed to move or not.  Hopefully the Petunia will like the northeast corner of the yard better than they like the south fence line. I think they should, overall, get more sunlight there, which will make them happier.
A bad picture of the transplanted petunia - you can't see anything.  That's why it's bad.  I guess if you get your magnifying glass, you can make out a few sticks sticking out of the ground, those would be the transplanted petunia.

Phase 6 was installing a 'step' to help climb the little hill thingy we have going on in our yard.  Of course ,this 'hill' was recommended to be removed by the garden bloggers at the Go-Go 2 Julys ago, but, as Bob says, 'anyone can have a normal looking tree' and I like having the grade change, so I'm going to try to keep it.  I was trying to figure out how this whole "add a step" thing was going to work out because I figured any time I tried to dig into the dirt, it would erode away with rainstorms.  And it may very well do that, but I figured since I had the red stepping stones from Phase 1, I might as well use them.  So instead of 1 step, I now have 3 and a half.  I say half because I only really need 3, but I didn't know what else to do with the 4th step, so it's kinda just laying in the dirt above the steps completing the little stair case.
Steps.  The plan is to plant a crapload of castiron plant along the fence.  Maybe I out to plant something with some height...I do have a Carolina Buckthorn tree that I have to find a place for...

You know what's gotten bad?  The laying in bed at night contemplating what to do.  Even though I have a plan, the husband has already up and changed one aspect of it, and so I've been contemplating what to do that will work for everyone (including the electric and cable workers that will need to get back to the box with some regularity).  Also, the area where I was going to put the little stock pond.  I think I've decided to switch it to a bird bath, but I'm not sure on if I want to keep the whole "flagstone patio" type look.  because that will still be a ton of rock in the back yard...maybe if I switch up the color it wouldn't be as noticeable...or maybe it'd be MORE noticeable.  I think having a dark loose rock (like pea gravel or river rock size) patio would look great with some cement squares laid out to walk on.  I'm pretty sure this goes under 'modern' and therefore the husband will nix it, but he'd be fine with the flagstone style set up.  Normally, I'd just do something and be like "don't worry about it, it'll be fine!"  The problem is that if my husband doesn't like it, I would never hear the end of it and every project I do after that will be a constant question of "Yeah, but remember how that patio turned out?  hideous."  It would be like my own personal "hideous bed." 

Tuesday, November 6, 2012

Sunday, October 14, 2012

Garden Design Implementation: Phase 1 of eleven - billionty

Last weekend (as in the 7th), I got some grand idea that I would start on my garden re-design. It was mostly because one of the irises I had bought was starting to turn entirely brown and so I wanted to get it in the ground.  Of course, in order to get it into the ground, I needed to have a place to put it so out to the yard to rip up a bunch of grass, horse herb and weeds I went.

First, I planned - using my plan, a measuring tape, some bike spokes and a tie down nylon, I laid out the areas where the plants were supposed to go.
It Begins...
After laying down the nylon, I started digging up grass (which also included digging up some stepping stones that I had forgotten where there).

Mid-project

Of course, ideally, I would have put the rain barrel on cinder blocks as per my resolutions list (which is actually part of the reason for delaying doing this part of the implementation), but I found out the downspout is riveted so that means we have to break the rivet before doing anything.  I may end up having to hire this out since I don't want it to look like crap when we're done with it.  As I got to the artemisia plants by the rain barrel, I just planted them in their new location.

Planted

I re-laid the nylon, dug up some of the Mexican Petunia to plant in the back and then cut it back by about a third or so (though one of the plants I should have cut it back even more - the reason behind doing this is so that the plant has the resources to put into root development without having to support all the greenery and flowers).  Since I didn't want to dig up more artemisia, there's an empty corner which I ended up planting some tulip bulbs - don't know if they'll sprout since they're really, really, really old.

A different angle

I predict right now that the biggest problem is going to be controlling the artemisia and petunia enough to let the irises get established since both will take over if allowed.  I may end up using some rocks from the rock area that I'm getting rid of to line the area because as of right now, I still have the nylon and bike spokes out there delineating the edge of the bed.

After finishing this, I went and tackled the mess that is the spotted spurge I started at the deck and started working toward the garden.  I got to about the tree before I had to take a break to eat something.  And that was when I realized I had spent 6 hours straight doing yard stuff.  Talk about going down the rabbit hole.

Now then, all I have to do is finish the rest of the yard...

Sunday, September 30, 2012

Plans

And of course I've already gone about making more changes.  Mostly because 1) when I was at the Sun City Plant Sale, I said to myself, "Self, you need some irises because they're in your plans." and so I bought myself 3 irises - a William A Setchell, a Jesse's Song, and a White Cemetery (I also found out that the husband does not like yellow irises).  Unfortunately, I only had space for one plant - and I know I intentionally planned it that way because I have a mystery iris that I've been moving around my yard looking for a good spot for it to call home.  and 2) Shawn started questioning the design of the patio area (bulbous thing on the upper left) - not so much that I wanted to turn it into a patio with bird bath, but more because 'what are we going to do with the rock that's already there?'  ummm...get rid of it.  duh.  Leave it to my husband to not care about the cost of re-landscaping, but to instead care about the fact that we would be getting rid of stuff.  So I've added more space for iris and have reduced the size of the patio, though now I need to come up with more plants to plant in the area that is going to be neither rock nor patio.

Wednesday, September 26, 2012

Project Update: Rose Bed


An updated photo of the 'rose bed' is in order.  The rose bush is a Dr. Huey rose, and I planted two zexmenia, a thyme plant and lion's tail in the bed as well.  This is likely the last of my "plopper" projects (admittedly, I had, to some extent, at least planned on putting the zexmenia here when I was at the Wildflower Center's plant sale going "I really, really want these...where am I going to put them?" But the lion's tail and the thyme were surprise purchases while at the spring Sun City plant sale and East Side Succulents, respectively).

And, of course, after looking at this photo (even though there is no mulch in the rose bed, it does have the color of mulch), I'm not digging the decomposed granite vs. mulch look...which means I'm either going to be raking up all the DG or adding it to the rose bed...maybe I can make it look 'artsy' in what parts are DG and what parts are mulch in the bed...

The beginning of the rose bed project can be seen here:
Project:  Rose Bed

Sunday, September 23, 2012

The Best Laid Plans of Mice and Men...

There are mighty plans afoot.  Mostly with entirely redoing the side yard/back yard.  It is a project that I've had in mind for over a year now, but I've just never done anything about it.  UNTIL NOW.  As per my goals I wrote up for the year, I have finally come up with a plan.  I know, this is as weird for me as it is for you.

As the back portion looks now - a 'dry creek' which doesn't provide anything other than a crapload of rock.  In the new plan:  GONE.  Replaced with a small rock patio area with bird bath.  Also gone: the invasive nandina in the back corner and the asian jasmine.
As the front-ish portion of the area looks - totally over grown.  In the plan:  rock edging is gone, the turk's cap and shrimp plant stay in the same locaitons but the violet and petunias move.  Also gone - the struggling grass.  I don't really have what will be used for the paths defined yet...maybe foot friendly groundcover, maybe mulch, maybe decomposed granite.

Man, this planning instead of plopping is hard stuff...

And don't worry - as soon as I get my plan scanned in, I'll share it (scanned, taken a photo of, whatever - I'm an engineer, not a graphic designer).

Thursday, September 20, 2012

Plopper vs. Planner

The area between the walk up to the house and the house itself is a no-man's land of 'plopping' goodness.  Society garlic I got from Diana and dwarf ruellia I got from Amy are the primary plants - two of each (not three, because 3 would have made sense, but why do something that makes sense when you can make it do something wonky?).  It also has a rosemary plant and a zexmenia plant (both from Bob).  The pots I added because there was no where else to put them (and I have a weakness for pots).  The pots are filled with succulents. 

You see, in gardening, you're either a planner or a plopper.  Ploppers can become planners, but rarely does a planner become a plopper.  A planner PLANS the garden - what plants, where they'll go...some even get really good at it and are able to get plants together that will compliment each other (whether in bloom color or foliage contrast), and add plants that provide 'seasonal interest.'  In my completely non-designer speak, I take 'seasonal interest' to mean 'doesn't look like a bare twig in January, or if it is a bare twig, it is going to be the best bare twig you ever did see.'

My beloved culinary ginger plant (zingiber officinale) and the beloved sugar cat completely ignoring me and waiting for the magical door fairies to come open the door for him.

A plopper, by contrast, PLOPS in the garden.  A plopper gets a plant, figures out what it needs to grow and then plops it in the ground in a fitting location with little regard to what is planted around it, when it will bloom, and how it looks in that location.  I am a plopper.  I can't pass up a good deal (including free plants gifted to me by other garden bloggers - they're totally thinking "I know, I'll give it to that sucker, Katina!").  Hell, I can't even bear to throw out plants that I don't need nor want - I'll dig them up and give them away to others "HAHA! I'll totally foist these off on those suckers known as fellow garden bloggers and/or coworkers!"   The point is most ploppers' yards are a mishmash of mixed plants and, during certain parts of the year, look devoid of all life.

My avocado tree.  I started this thing from a pit in May 2005.  See, I can't even throw out things that are POTENTIAL plants.

As I said, it's very possible for ploppers to become planners, but difficult to go vice versa.  Since I'm a plopper and I'm trying to be a planner, I have gotten started on coming up with a comprehensive plan for the back yard - hey man, I gotta start small...of course, it would probably make more sense to do the front yard since that is the one that people see...but we're going to start with baby steps...

Sunday, September 16, 2012

Project: Hell Strip update

A picture of the hell strip after the summer (not that I think we're out of the woods with 100 degree days).  Admittedly things are a little parched, but the artemisia, feather grass, and alamo vine are doing great.  The rest of it?  Not so much...I mean it's mostly alive, mostly doing well, but not spreading...maybe when the cooler weather kicks in that will change.


You can see previous entries about this project:
A Month After Planting
After Planting
The Beginning

Saturday, July 14, 2012

Santa Fe Yards

Juniper and Chimisa (probably among other things) hiding the semi-circular driveway.
Whilst in Santa Fe, it became pretty obvious (at least in the art district - I can't really speak to any other area), that grass in yards was uncommon.  My husband paid attention more than I did and said that of all the places we walked by, only 2 had grass.  It was a good experience because he's been telling me for a while that yards can't look good in a "normal" setting if they don't have grass ('normal' means living in a house and you can easily walk from your front door to your neighbor's front door in less than 2 minutes).
While I think yards without grass look perfectly fine, I do believe that it's much more difficult to have your grass-less yard look apropos and be accepted by the neighbors when you're the only one on the block to have no grass.  But he claims that it is totally all about the grass - so to have him say afterward that the grass-less yards looked good (nay, better) than the grassed yards is a major step forward in my plans to remove even more of our lawn in the future.  (Also, and slightly related, I can't wait for Pam Penick's "Lawn Gone" book to come out next year)

Shawn taking a breather at one of the two yards with grass.


I was actually surprised by how many plants I knew, but of course there were still plenty that I didn't recognize (naturally, all of those pictures are out of focus).  It seemed like day lillies were very common, as well as California/Mexican poppies and hollyhocks.  Not super common: cacti.  Surprising.  To me at least.  Of course there were places that used annual plantings in pots for color.

A picture of Shawn taking a breather - again.


Obviously, wide paths were very popular (I would suspect they'd have to be when you're running an art gallery out of a house).  My sister took more pictures than I did of plants and yards and art and everything, so hopefully she'll post some of them somewhere in a public-type forum so I can link to them.

A good use of Iris.  I don't remember any other places using iris, or if they did it was an iris plant here or there, not any groupings like this.


Almost all of the yards were walled in with adobe walls - they weren't necessarily tall (at most 4'), but they did make everything seem much more like "This is my little space and I will do with it what I see fit."  Which I think allowed for all sorts of different plants and designs.  I don't know why, but I figure it's a little tougher to make yards look like they fit in when you're having to account for what your neighbors are doing as well - for example, thinking back and realizing that there were only 2 yards with grass, it would be very easy for the grassed yards to look out of place when they're surrounded by non-grass yards, but I didn't even notice them, which just means I was looking at each yard as a clean slate.  And I think that is directly attributable to the walls separating each of the lots.

One of the few places that had something out for the birds (a disappearing fountain).  Naturally, it's a piece of artwork and is for sale.


I was very impressed by the amount of flowers planted along driveways and alleys.  It was almost like "I have 1' x 5' of space - I can plant stuff here!"  These types of locations are where most of the hollyhocks and California poppies were.
An alleyway with the ever popular branch fence.  My Grandma told my sister and me about how she used to make dolls out of hollyhocks as a kid.


If you care to look at all the other photos from the trip, you can view the Carlsbad Caverns/Guadalupe Mountains photos, and the pictures of the family in Santa Fe.

Sunday, April 1, 2012

Planting

My mother in law has been a busy bee and planted a bunch of plants in her yard.  Unfortunately, from the pictures below you can't really tell.  Thus the problem when using 4" pots to fill in a space.  I'm sure I'll take more pictures as the plants fill in...


Next up:  creating a stone pathway from the back door to the bedroom door.

Other posts on my In Law's yard:
Design
Paths
Implementation 

Friday, March 2, 2012

Project: Rain Garden

It all began with my In Law's yard. 

When I saw how much they had completed back in October, I came home and immediately went to work digging a hole for a (at the time) non-existent tree.  When I felt the hole was sufficient, I moved onto digging a hole at the end of our dry river bed.  Over time, the end (just out side of the rocks) started eroding away (technically its probably more like when the water ran out of the bed it wasn't spread out enough).  In my gardening-high, I decided that the universe was telling me  I needed a rain garden.  Thus the hole.  A spur of the moment decision with little to no planning.  Of course the husband was a bit more concerned about this hole in the middle of the yard and my telling him "don't worry!  it'll be fine, you'll see!" didn't really placate him.  So just to show him it would be fine, I didn't do ANYTHING on the project for the next 3 months.

Before-ish.  below shows the area already dug out and full of rain water (it's about 6" deep at the center).  I didn't do the saturation test like I was supposed to (mostly because I know the rainwater doesn't stay around for long in the actual dry river bed plus I figured that a hole not lined with landscape fabric would drain even quicker), but Mother Nature helped out and did the test for me - good news, it drains within 24 hours:


After: the plants are planted, mulch placed and rocks on top of that (Yes I realize this isn't a very good angle since you can't see how it is tied in with the original rock bed).  I didn't have to buy any additional rock - the rock around the outside all came from the front yard Hell Strip area - the previous owners had rocks interspersed with the jasmine. The jasmine just grew over them over time, and so when we removed the dead jasmine (yes, we were lucky and the combination of full sun and no water finally killed off the hell strip jasmine), we found a plethora of rock.  The rock that filled in the hole came from the dry river bed - in some places the rocks are 2-3 deep, so I just looked for loose rocks that didn't expose any of the landscape fabric and moved them over to this area:


Close up showing the plants - top left: Artemisia; top right: Gregg's Mistflower; bottom: Peter's Purple Monarda (picture taken immediately after planting).  I realize that none of these may be considered rain garden plants and they may all die.  That is fine.  I didn't have to pay anything for these plants as they're all from plants I already have in the front yard.  The artemisia is planted at the high point so I don't actually expect it to ever be under water (see first picture - the artemisia is at the high point between the original river bed and the new part).  If it does grow, it should hopefully spread along the ridge and will act as a spreader and slow down the water coming into the garden.  The Gregg's mistflower at the other end should hopefully grow and also act as a spreader and slow down the water leaving the garden (thus preventing any more eroding of the lawn area).

Saturday, July 30, 2011

It was all a Go at my house this morning...


This morning, a bunch of Garden bloggers all convened on my house to give me ideas of what to do with my "part All Shade, part All Sun, and Drainage Problems All Over" area of my yard (basically the south side of the house). Along with many great ideas for plants and grading suggestions, I also received a couple of awesome gifts. Diana from Sharing Nature's Garden gave me the little metal dragonfly in the top picture (which is sitting on top of Daphne's garden plan).


Bob from Central Texas Gardening gave me a white Philippine Violet, Ronny from The Lazy Shady Gardener gave me Silver Squill and Soap Aloe. Last but not least, Bob from Gardening at Draco made a butterfly (for lack of a better word) doodad 'specially for me.


I was so excited about having everyone over, I totally spaced that I was going to give away a tea towel that I'm sewing. Le Sigh.

Tuesday, December 21, 2010

Design

My inlaws moved to Texas a few months back and of course watered their lawn as good home owners are to do (especially good home owners who live in a neighborhood where the home owners association looks down on those that allow their grass to go dormant in August).

But they have a problem with their yard. The back yard is completely shady (in the summer, in the winter it's okay since the trees lose their leaves). When they first moved down, they were watering the yard 3 times a week, and unfortunately, that meant that the back area was kept pretty wet most of the time. Much like how Mayflowers bring pilgrims, we all know what wet, muggy conditions bring: Mosquitoes.

They had an exterminator come out and spray, they went out and sprayed, they bug-bombed and did other non-eco-friendly things. After asking us multiple times what exactly we did to deal with the mosquitoes; and after us telling them multiple times that the only way we've found to deal with it is to not water the areas we have mosquitoes, or more specifically, STOP WATERING THE GRASS, they finally cut back to watering the back yard shady area once a week.

Now then, the grass they have is buffalo. Which does not grow in shade (also it shouldn't need to be watered 3 x a week, but that's neither here nor there). So obviously now their back yard is a large dirt patch. They don't like having a dirt patch for a yard. My mother in law has decided that after Christmas they will put in a limestone paver patio area just outside their sun room. But she wanted to re-sod the rest of the yard with grass. I think I managed to convince her that she shouldn't plant grass and she should really plant some plants to fill in the space instead.

The problem with this plan? She says she's not good at design--she can't see things or create things the way that some people can (I'm looking at all of you landscape designers out there). The problem is, neither can I. Normally, I tell people to utilize the services of some fellow garden bloggers who do garden design for a living (like Pam, Philip, and Jenny and I'm sure there are many others out there who I can't think of right now) when they have an entire yard that needs to be redone. In this case, however, I know that the recommended plants and the amount needed of them that are shade tolerant and deer resistant are more than likely going to cost enough to cause my mother in law to have a small coronary, and I like to keep the amount of cardiac events that my in laws have to a minimum. So instead I told her about the City of Austin's Grow Green program which came out with some pre-canned designs for various types of gardens. The problem is that they have a Shade Garden plan, a Deer Resistant Garden plan and a Classic Garden plan. You notice that there's not a Shade Tolerant, Deer Resistant, Classic Garden plan.

So, I have now somehow managed to volunteer myself to help her with designing, and quite possibly implementing, her garden. This will be fun? frustrating? will go massively wrong because of our combined ineptitude? Currently I'm predicting all three of those F's.

But stay tuned, I have a feeling I'll be blogging about this every once in a while.