My inlaws moved to Texas a few months back and of course watered their lawn as good home owners are to do (especially good home owners who live in a neighborhood where the home owners association looks down on those that allow their grass to go dormant in August).
But they have a problem with their yard. The back yard is completely shady (in the summer, in the winter it's okay since the trees lose their leaves). When they first moved down, they were watering the yard 3 times a week, and unfortunately, that meant that the back area was kept pretty wet most of the time. Much like how Mayflowers bring pilgrims, we all know what wet, muggy conditions bring: Mosquitoes.
They had an exterminator come out and spray, they went out and sprayed, they bug-bombed and did other non-eco-friendly things. After asking us multiple times what exactly we did to deal with the mosquitoes; and after us telling them multiple times that the only way we've found to deal with it is to not water the areas we have mosquitoes, or more specifically, STOP WATERING THE GRASS, they finally cut back to watering the back yard shady area once a week.
Now then, the grass they have is buffalo. Which does not grow in shade (also it shouldn't need to be watered 3 x a week, but that's neither here nor there). So obviously now their back yard is a large dirt patch. They don't like having a dirt patch for a yard. My mother in law has decided that after Christmas they will put in a limestone paver patio area just outside their sun room. But she wanted to re-sod the rest of the yard with grass. I think I managed to convince her that she shouldn't plant grass and she should really plant some plants to fill in the space instead.
The problem with this plan? She says she's not good at design--she can't see things or create things the way that some people can (I'm looking at all of you landscape designers out there). The problem is, neither can I. Normally, I tell people to utilize the services of some fellow garden bloggers who do garden design for a living (like Pam, Philip, and Jenny and I'm sure there are many others out there who I can't think of right now) when they have an entire yard that needs to be redone. In this case, however, I know that the recommended plants and the amount needed of them that are shade tolerant and deer resistant are more than likely going to cost enough to cause my mother in law to have a small coronary, and I like to keep the amount of cardiac events that my in laws have to a minimum. So instead I told her about the City of Austin's Grow Green program which came out with some pre-canned designs for various types of gardens. The problem is that they have a Shade Garden plan, a Deer Resistant Garden plan and a Classic Garden plan. You notice that there's not a Shade Tolerant, Deer Resistant, Classic Garden plan.
So, I have now somehow managed to volunteer myself to help her with designing, and quite possibly implementing, her garden. This will be fun? frustrating? will go massively wrong because of our combined ineptitude? Currently I'm predicting all three of those F's.
But stay tuned, I have a feeling I'll be blogging about this every once in a while.
Tuesday, December 21, 2010
Winter gardening
So I planted more spinach (the rest of the seeds that I had), more peas (only a handful) and more carrots (yellowstone and whatever the orange variety that is in the packet - nantes, maybe?).
The broccoli is the only thing that seems to be actively growing, though the cauliflower is starting to look robust and the quinoa is looking like an actual plant (maybe if I can keep it alive until February, it will take off and it will be like I started the seed at the right time). All the garlic is doing swimmingly and the onions are green and healthy looking.
I pulled out all the tomatoes and the remainder of the peppers (except for the habanero). I had forgotten that the reason I planted the lemon boy tomato in the spot I did was because I had a problem with root nematodes in that spot last year. And lemon boy, while sometimes marketed as an heirloom, actually isn't and therefore is not as susceptible to the same problems as heirlooms. So yeah, the little Ananas Noire plant that I planted in that spot for the fall didn't fare so well. Or rather the plant seemed to be doing fine until I pulled it out of the ground and realized that it really wasn't.
I transplanted the Red Hot and Hot Yellow peppers into pots so I can bring them in and hopefully overwinter them. Both looked great this morning which is a plus.
Now then, I just have to remember to get to the store to buy some marigolds to put in the nematode spot...
Saturday, November 27, 2010
Freezing
I thought for sure that by me going and picking off all the large-ish tomatoes and peppers that it would for sure guarantee that it would not freeze last night. And oddly enough, I don't think it did. It did, however, get cold enough to kill off the bell peppers (even though they were covered), the cayenne, most of the habanero and obviously the eggplant (I say obviously because it wasn't even covered, and it tends to die as soon as it hits 35 degrees). The tomato plant made it through okay, so i've gone and covered it again along with the little pepper plant and the habanero.
The reason I don't think it made it down to freezing last night? because all the other plants I didn't cover that should have been frost damaged for sure, weren't. So either the microclime in the garden corner is colder than the front yard and the side yard, or the peppers and eggplants die when it's 34 degrees outside.
You know, I really ought to invest in an analog thermometer--the digital ones keep breaking or the batteries keep dying or something.
Also, I planted the onion starts I got from Ross, I ended up with more this year, but not all of them look like they're going to make it...which means I'll probably end up with about the same as last year. Which turned out pretty well--I just used up the last of the garden onions last night.
Friday, November 26, 2010
Frost II
sorry for the weird formatting, I can't get my phone to play nice with Blogger. Only sad because they're both run by Google


i've covered the plants again in preperation for another freeze (though i question if it actually froze at my house last night since nothing seemed damaged). last night i had covered my 2 larger tomato plants and left the smaller one to fend for itself; today i figurred out most of the tomatoes on the plants could probably be pulled, whereas the ones on the small tomato could not. so out with the big plants and covering the small one it is. of all the covered plants, the vast majority are peppers--I'm hoping to get some more large and/or ripe peppers before the plants die.


i've covered the plants again in preperation for another freeze (though i question if it actually froze at my house last night since nothing seemed damaged). last night i had covered my 2 larger tomato plants and left the smaller one to fend for itself; today i figurred out most of the tomatoes on the plants could probably be pulled, whereas the ones on the small tomato could not. so out with the big plants and covering the small one it is. of all the covered plants, the vast majority are peppers--I'm hoping to get some more large and/or ripe peppers before the plants die.
Thursday, November 11, 2010
Frost
So...We're at that time of year again. The time of year when the below freezing temperatures start. When I was a kid in elementary school, the teachers would always hold a contest where the goal was to guess the first day of the year that the snow would stick to the ground (the cement/asphalt). Of course they always offered some prize of some sort, and I don't really have any prizes that anyone would really want...so bragging rights it is!
So what are your guesses of date when we get the first hard freeze (below 32 F for at least 2 hours) at Camp Mabry? at ABIA?
If you don't want to leave a comment, you can also tweet me at @kmbbohrer
I'm guessing December 27.
So what are your guesses of date when we get the first hard freeze (below 32 F for at least 2 hours) at Camp Mabry? at ABIA?
If you don't want to leave a comment, you can also tweet me at @kmbbohrer
I'm guessing December 27.
Wednesday, November 10, 2010
Experiment: Potatoes
So, as I'm sure you've noticed, I've been MIA since the beginning of the month. Firstly, I didn't have anything to blog about on this blog, and secondly, if you follow my tweets, then you know I've been out of town since the 5th.
Luckily everything survived the cold-ish weather. Trust me, I was fuh-reak-ing out when I landed in Boston and found out there was a freeze watch in effect for Austin. And I had debated long and hard about whether to bring the plumeria plant into the house or leave it outside. I opted for a sorta compromise and left it outside but right next to the sliding glass door (hoping that it would keep it warm enough at night).
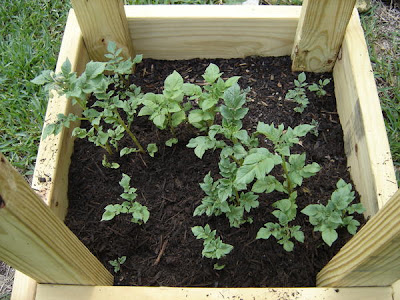
Upon returning, everything looked good. I was quite surprised that the avocado tree was not all wilty and in need of a good soaking. The potatoes, however, did look worse for the wear. A lot worse. As in "little mushy brown sticks" worse. Now then, this wasn't that much of a surprise since the plants had been turning yellow and starting to look like they were going to give up the ghost, so I went ahead and let nature take it's course. I'm guessing that it was a combination of not enough light and too much water that did them in as the plants didn't look diseased.
Anyhow, if you go back through time, you can see that I planted them at the beginning of September. This indicates that there was slightly over 60 days from when I planted to when I harvested. All of the varieties should have been in the ground for at least 90 days.
BUT!
Even though the potatoes are small (quite a few are smaller than a dime), I did end up harvesting about 20 potatoes. I do not know if the box helped at all (in fact I don't think it did since all of the potatoes were at about the same level as the original seed potato (indicating that the potatoes are not ones that really need 3' of mulch on top of them to get a good harvest)).
Anyhow, I will try this again in the spring planting season (aka January).
Luckily everything survived the cold-ish weather. Trust me, I was fuh-reak-ing out when I landed in Boston and found out there was a freeze watch in effect for Austin. And I had debated long and hard about whether to bring the plumeria plant into the house or leave it outside. I opted for a sorta compromise and left it outside but right next to the sliding glass door (hoping that it would keep it warm enough at night).
Upon returning, everything looked good. I was quite surprised that the avocado tree was not all wilty and in need of a good soaking. The potatoes, however, did look worse for the wear. A lot worse. As in "little mushy brown sticks" worse. Now then, this wasn't that much of a surprise since the plants had been turning yellow and starting to look like they were going to give up the ghost, so I went ahead and let nature take it's course. I'm guessing that it was a combination of not enough light and too much water that did them in as the plants didn't look diseased.
Anyhow, if you go back through time, you can see that I planted them at the beginning of September. This indicates that there was slightly over 60 days from when I planted to when I harvested. All of the varieties should have been in the ground for at least 90 days.
BUT!
Even though the potatoes are small (quite a few are smaller than a dime), I did end up harvesting about 20 potatoes. I do not know if the box helped at all (in fact I don't think it did since all of the potatoes were at about the same level as the original seed potato (indicating that the potatoes are not ones that really need 3' of mulch on top of them to get a good harvest)).
Anyhow, I will try this again in the spring planting season (aka January).
Sunday, October 31, 2010
Fall Garden In and Mulched
I planted the fall garden a few weeks back. And I went out and mulched it yesterday in preparation for an upcoming trip out of town (I feel bad about asking the neighbor, who is already watching the cats, to also water the garden for me). So far nothing has really grown (which is kinda how fall gardening goes down here...a whole lotta waiting going on).
All garlic varieties did sprout (though variety 1 (Burgundy) only has 2 out of 5 actually growing). The quinoa seems to be growing, but the plants are just so piddly, it makes me think that I should really try this again in the spring to see if it grows any quicker (it really should since it's an amaranth). The spinach never germinated, and I think I killed off the chard and beets by not watering enough. Oddly, this lack of water didn't kill off the carrots (I tend to think of carrots as some wimpy little plants, but they are proving to be tougher than I expected/remembered).
On the spring garden front, the tomato plants all have little tomatoes on them, the green bean plant is going crazy again so I had to cut it back otherwise it would have taken over my Purple Cherokee. The bell peppers finally have some peppers on them. The only plants that aren't producing are the eggplant, the habanero (though it does have tons of flowers), and the yellow hot pepper plant. I think I'll be pulling the eggplant when i get back from vacation as I doubt anything starting now will be able to be very big by the time I have to pull it because of a hard freeze, and while last year, it worked out okay, that was probably because the plant had 8 eggplants on it when we had that freeze.
Wednesday, October 27, 2010

Wednesday, October 20, 2010

Saturday, October 16, 2010
Garlic Update
I planted the garlic on the 2nd of October this year (earlier than last year). Since I had seaweed solution, I soaked all the cloves in a baking soda/water/seaweed solution over night, drained, and then soaked all the cloves in rubbing alcohol for about 5 minutes.
As I planted 7 varieties this year (5 I ordered, 2 are from last year's stock), I used plastic cups I've obtained over the years, mostly from Clear Springs, Rudy's and the Oasis to keep all the varieties separate.
I planted the garlic in rows instead of in squares (hopefully this will make it easier for me in the spring when I start planting stuff), and they are numbered from right to left, with blue zip tie markers at the beginning of each row (once they're growing, the zip tie markers won't be needed).
1. Burgundy
2. Shilla
3. Maiskij
4. Applegate
5. Inchelium Red
6. Lorz Italian
7. Polish White
Garlics 4, 5, and 7 are essentially only half rows as I already had other things planted in the second half (that means there are only 3 plants per row instead of 5).
As of today, all of the varieties have sprouted except for the Burgundy and the Inchelium Red.
Friday, October 1, 2010
Garlic growing season 2011
As I didn't think I could replant the garlic I had last year (something I had in my head about cloves could only be smaller than what the parent clove was, which I don't think is necessarily the case--that's the case with pineapple, though), I went ahead and ordered another 2 pounds of garlic for planting from Gourmet Garlic Gardens. I also have some seaweed solution stuff so I'm going to add that to the soaking wash tonight. I'll likely have left over garlic again this year so if you want to try growing it, let me know.
The varieties for this year are thusly:
Polish White: An Artichoke Garlic. Rich, mellow garlic flavor - very little pungency when raw. Harvests in late spring/early summer - Stores through fall into winter. Great for raw eating - Grows well in cold and warm winter areas.
Inchelium Red: An Artichoke Garlic. Medium rich garlic flavor - medium pungency when raw. Harvest in early summer - stores through winter. A rich, medium softneck that grows well all over the USA.
Lorz Italian: An Artichoke Garlic. Rich garlic flavor - Very hot pungency when raw. Harvests in early summer - stores through the winter. Great heirloom Italian garlic - Thrives almost anywhere.
Maiskij: A Turban Garlic. A rich garlic flavor - hot pungency when raw. Harvests around June - Stores well into fall.
Applegate: An Artichoke Garlic. Very mild flavor - Very little pungency when raw. Harvests early in season - Stores 5-6 months.
I will also be planting some that I grew last year:
Shilla: A Turban Garlic. A rich garlic flavor - warm pungency when raw - harvests very early in the season - stores through fall.
Burgundy: A creole garlic - Very rich garlic flavor - mild/mellow pungency when raw - harvests in mid season - stores 8-10 months.
Prepping the Garden
Before: The beds are overrun with basil and lemon balm. The cat is my other cat (Quazi), he never is in any of my garden pictures because he's always much more concerned about hunting things (things he rarely catches since we all know that Ivy is the real hunter between the two).
 The beds are overrun with basil and lemon balm. The cat is my other cat (Quazi), he never is in any of my garden pictures because he's always much more concerned about hunting things (things he rarely catches since we all know that Ivy is the real hunter between the two).
After: All basil plants removed, lemon balm cut WAY back, and all parsley pulled out of the bed on the left (I don't know how I got so much parsley in that bed in the first place--I didn't even PLANT parsley this year. When I was planting the left bed in March, I was planting the garden while my mother in law was pulling the weeds out of the lawn; at one point she asked if I knew what the weed was that looked and smelled like parsley that was everywhere in the yard. I told it her WAS parsley and she was surprised. I guess it's one of those things that she was only expecting to find it in the garden beds and was surprised it wasn't where it should have been. I could have pulled all of it out as it was growing, but opted against it since it acted like mulch and I ended up chopping it up and putting it back in the garden bed to act like green manure.
 All basil plants removed, lemon balm cut WAY back, and all parsley pulled out of the bed on the left (I don't know how I got so much parsley in that bed in the first place--I didn't even PLANT parsley this year. When I was planting the left bed in March, I was planting the garden while my mother in law was pulling the weeds out of the lawn; at one point she asked if I knew what the weed was that looked and smelled like parsley that was everywhere in the yard. I told it her WAS parsley and she was surprised. I guess it's one of those things that she was only expecting to find it in the garden beds and was surprised it wasn't where it should have been. I could have pulled all of it out as it was growing, but opted against it since it acted like mulch and I ended up chopping it up and putting it back in the garden bed to act like green manure.
Today's projects:
Clean the kitchen and bathrooms
Add more soil and compost to the bed on the right
Add more compost to the bed on the left
Add more compost/mulch to the potatoes (and think about adding another level of boards)
Plant the cauliflower and broccoli starts
Start the garlic soaking overnight and plant that tomorrow morning
Plant plants I picked up last weekend
Plant some seeds (staggered throughout october and november)
and finally, move the passion vines to a different location.
Yes....welcome to October.
Sunday, September 26, 2010
Potato Update
An update on the potatoes:
Today I had to go out and add some more stuff to the box as a few of the vines are about a foot tall. I made a mix of compost and mulch to add and then I hilled it around the taller vines. I guess that's a problem I hadn't thought of - if you plant different types in the same spot, they may not grow at the same rate. not a problem, I'll just have to check on them and add mulch/compost as necessary.
 showing the potatoes growing, and after adding mulch--they're all growing toward the north (I think it's because I have an ash tree to the south so it seems, to the plants, that the strongest light is north). Please disregard my giant bucket of stuff that needs to go in the compost bin that's in the background.
looking down on the 'tatoes. This is the same angle as when I planted them. For a comparison, see below. You can't see it in the picture, but the red lasoda potato vines have reddish veins, and the purple vikings are yellow, the all blues are TINY, but their veins are a dark purple color...which I didn't realize it before, but the eyes of the potatoes below show the same type of thing.
Saturday, September 25, 2010
Preserving Basil
As I had approximately 8 gabillion basil plants this year, I decided that I really needed to try to do SOMETHING to preserve as much basil as possible for later use. Generally speaking, the options are freezing and drying (but oddly not freeze drying...but that may be because it requires some equipment that I don't have).
So, first, we will talk about the Drying methods:
Drying is easy to do. I had been using the dehydrator I got as a Christmas present about 10 years ago, but that still requires electricity, time, and precious counter space. Even though the dehydrator information manual tells me that basil should only take like a day or two to dry out, I've noticed that it takes longer than that--stupid humidity. So I usually let it run about a week. The biggest problem with this method is that I'm limited by the size of the dehydrator, and it takes time to pick all the basil leaves, wash them, and arrange them on the drying racks. Which brings me to drying option number 2: the hanging hook. The hanging hook is one of those hook things in the ceiling--I believe the previous owners used it for a hanging plant of some sort. entire basil plant hanging from the hanging hook.
I use it as a place to dry all of my stuff that needs to dry before storage--onions, garlic, oregano, basil, etc. Obviously this method also has its benefits and drawbacks. Benefits: it doesn't take up counter space, it doesn't use electricity, it gets the job done, and the prep is quicker--cut off the plant at the ground, spray down with a hose, pick off all the icky leaves, use twine to tie it up to the hook. Drawback: its in my kitchen and its set up in a way that as soon as you walk in the front door you can see it hanging there.
And now we move onto the Freezing methods:
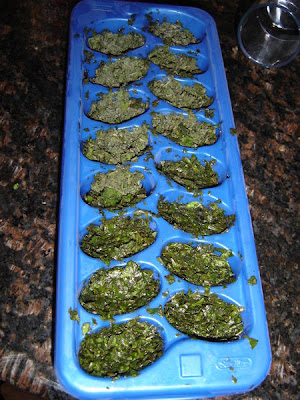
Quite honestly this will be the first year that I've done freezing of basil--it never crossed my mind prior to making spaghetti sauce from a recipe my friend Kristie gave me [note: the entry I linked to is one pretty benign, but if you read any of Kristie's other entries, I warn you now that if you have delicate sensibilities, you might get offended... she's hysterical, but still, you've been warned.]--the recipe made so much I ended up putting most of it in empty spaghetti sauce jars and then we had to eat spaghetti for 8 of the next 14 nights. And that's when Kristie told me that I could have just put the sauce in Ziploc bags and put them in the freezer. When I mentioned this to one of my other friends, she said that she normally would make pesto and then freeze it in ice-cube trays since one cube made about one serving of pesto for her. And that's when it dawned on me that while I didn't like pesto I could still do the same process with just plain basil.
Now then, I've heard of using both water and oil (never together) as the liquid for this, and I figure either will work; in fact Iris over at Society Garlic uses water instead of oil and she also has a comprehensive 'how to' on her blog. Depending on how much water you add, you may have to take that into account when adding it to your sauce, and this is probably more of a problem if you're using whole basil leaves instead of the mushed up variety like I am. Obviously if you're going to do this for pesto, you should just use the oil since I believe that's added to pesto anyway.
I worked on this throughout the day and finally came up with the quickest way to do it.
The steps are thusly:
I have found that the size of cube I make can make a double batch of spaghetti sauce, being spiced to my preference. Also, the plant I used was massive, and made 32 cubes. My friend from work also used one of her plants (which was much smaller) and it only made 4 cubes. Now then, on to the remaining 7 gabillion basil plants...
So, first, we will talk about the Drying methods:
Drying is easy to do. I had been using the dehydrator I got as a Christmas present about 10 years ago, but that still requires electricity, time, and precious counter space. Even though the dehydrator information manual tells me that basil should only take like a day or two to dry out, I've noticed that it takes longer than that--stupid humidity. So I usually let it run about a week. The biggest problem with this method is that I'm limited by the size of the dehydrator, and it takes time to pick all the basil leaves, wash them, and arrange them on the drying racks. Which brings me to drying option number 2: the hanging hook. The hanging hook is one of those hook things in the ceiling--I believe the previous owners used it for a hanging plant of some sort.
 entire basil plant hanging from the hanging hook.
I use it as a place to dry all of my stuff that needs to dry before storage--onions, garlic, oregano, basil, etc. Obviously this method also has its benefits and drawbacks. Benefits: it doesn't take up counter space, it doesn't use electricity, it gets the job done, and the prep is quicker--cut off the plant at the ground, spray down with a hose, pick off all the icky leaves, use twine to tie it up to the hook. Drawback: its in my kitchen and its set up in a way that as soon as you walk in the front door you can see it hanging there.
And now we move onto the Freezing methods:
Quite honestly this will be the first year that I've done freezing of basil--it never crossed my mind prior to making spaghetti sauce from a recipe my friend Kristie gave me [note: the entry I linked to is one pretty benign, but if you read any of Kristie's other entries, I warn you now that if you have delicate sensibilities, you might get offended... she's hysterical, but still, you've been warned.]--the recipe made so much I ended up putting most of it in empty spaghetti sauce jars and then we had to eat spaghetti for 8 of the next 14 nights. And that's when Kristie told me that I could have just put the sauce in Ziploc bags and put them in the freezer. When I mentioned this to one of my other friends, she said that she normally would make pesto and then freeze it in ice-cube trays since one cube made about one serving of pesto for her. And that's when it dawned on me that while I didn't like pesto I could still do the same process with just plain basil.
Now then, I've heard of using both water and oil (never together) as the liquid for this, and I figure either will work; in fact Iris over at Society Garlic uses water instead of oil and she also has a comprehensive 'how to' on her blog. Depending on how much water you add, you may have to take that into account when adding it to your sauce, and this is probably more of a problem if you're using whole basil leaves instead of the mushed up variety like I am. Obviously if you're going to do this for pesto, you should just use the oil since I believe that's added to pesto anyway.
I worked on this throughout the day and finally came up with the quickest way to do it.
The steps are thusly:
- cut down a basil plant to the ground (this is because I'm trying to clear out basil plants so I can plant the fall garden, otherwise you can just pull stems off as you normally would).
- Spray down with a hose.
- Swing the plant around violently to try to get as much water as possible off of the leaves. Seriously--pretend you're a Jedi.
- Get a giant bowl and then pick off all the good leaves (no yellow or bug-befouled leaves) and put them in the bowl.
- Once you've cleared the plant of good leaves, or filled the bowl, whichever comes first, get out your food processor and put a bunch of leaves in it. (the picture below is before I started pulling off the good leaves and putting them in the bowl and instead I was pulling off stems and then pulling off leaves and putting them directly into the food processor. So much more time)

- Turn it on, as it's whirling away, drizzle olive oil into the top (generally I used about 2T per initial filled processor, then I'd add more as needed, but I doubt I used more than 4T per batch, and this time I made 4 batches)
- If it seems as if the bottom leaves are getting chopped but the top ones aren't, turn off the processor and use a spatula to move everything around. Turn the processor back on and hopefully it will start chopping the top leaves.
- Add more leaves through the top hole, and add olive oil to keep everything lubricated.
- When the processor is full of chopped basil (or you're out of basil to add), turn off the processor and scoop all the good chopped basil into clean, empty ice cube trays. (the ones at the top of the picture are already partially frozen, and the ones at the bottom were just scooped into the tray).
- Freeze
- Turn out basil cubes and place them in clearly marked Ziploc bags in the freezer.
- Use as desired.


I have found that the size of cube I make can make a double batch of spaghetti sauce, being spiced to my preference. Also, the plant I used was massive, and made 32 cubes. My friend from work also used one of her plants (which was much smaller) and it only made 4 cubes. Now then, on to the remaining 7 gabillion basil plants...
Saturday, September 18, 2010
Gigantor
 That's one of my bell pepper plants on the right. It's as tall as the 5' tomato cage. That's insane. It also has never flowered. sigh.
just to the left and right of the pepper plant are my copious amounts of basil. I think I'm going to be freezing some basil pretty soon. yeesh.
Thursday, September 16, 2010
Experiment: Potatoes

Update on the potatoes: They're sprouting.
Picture taken one side counter clockwise from the original indicator of potatoes (yeah, I know i'm not making sense. I'm standing one side to the right of the previous photo which you can see here.)
All this mostly indicates is that some of the red lasodas and possibly one of the purple vikings has sprouted. Still waiting on those all blues...
Sunday, September 12, 2010

Wednesday, September 1, 2010
A potato box: In pictures
 Left to right: 6 red lasoda, 2 purple viking, 4 all blue
 The box. 3 levels of it anyhow. boards are added as the plant grows and you fill in the box with dirt/mulch/leaves/whatever you can find that will keep it dark.The potatoes in the dirt. I'm standing on the west side of the box (one side to the left in the above picture). From top to bottom: All blue, purple viking, red lasoda
In reality, you're supposed to place the potatoes on prepared soil that's at the bottom of the box, and only have one level of boards in place. Since I'm putting the box on top of an old tree stump, I had to put prepared soil in the box and then place the potatoes and then cover it with more dirt (thus the 3 levels of boards). The picture showing the box above is filled to the level where I placed the potatoes, I added another 4" of soil on top of that and so now I've got maybe 4" of board left. As the potato plants grow, I will add another level of boards, fill in with dirt (or more likely some type of mulch) and allow the plants to grow for as long as they will.
The reason why this is supposed to be so good is because, in theory, come harvest time, the bottom board can be pulled away, the potatoes on that level harvested, and the board replaced. A week or so later you can pull the second board off and harvest those potatoes. Repeat this "moving up" process until all the potatoes are harvested. In reality, I think it's going to be more of a just pull off all the boards on one side when it's time to harvest and harvest them all at once.
What I hope to accomplish with this experiment:
a) get more potatoes than I planted
b) harvest some potato seeds (as the plant does flower) and see if I can get them to grow plants next year. I figure this must be tough to do or something, otherwise people would be doing this instead of using seed potatoes.
c) have this still going and doing fairly well when my mom comes to visit in a month or so (she is, after all, the reason why I'm doing this experiment in the first place)
Other experiments, albeit unplanned:
I bought some sweet potatoes at the store a few weeks ago and they started sprouting. I broke off the sprouts before cooking the potatoes tonight and planted some of them in a pot of dirt.
Tuesday, August 31, 2010
Tomorrow
Tomorrow I will regale you with stories of the Potato Box and other sundry items. But not now. It's too late now, so I will do it tomorrow after work.
Wednesday, August 18, 2010

Monday, August 16, 2010
Light

I was playing around with the telephoto lens taking pictures of butterflies and horn worms and when I looked through the viewfinder, at one point, I saw this, and I thought it was pretty with the light and the tomato leaves. So I took a picture of it. Note: I haven't done any work on this photo, what you see is what you get (but I would recommend clicking to embiggen).
Sunday, August 15, 2010
On the Road Again
I never really realized just how many photos of gardens or being in gardens I take when I'm on the road, so to speak.
 Sunflowers and with church in background. Straubing, Germany
On our honeymoon, I took photos of gardens in each of the countries we visited (Switzerland, Germany and Austria, albeit the Austria photo is of a hedgehog in the garden bed), and this was before I was a garden blogger or had even thought about starting a garden blog.
 Flower garden in Lauterbrunnen, Switzerland
Though to be fair, I only took the picture of the flowers in Lauterbrunnen because it had rained the ENTIRE time we were in Switzerland except for the last day and passing these flowers cheered me immensely. We, of course, had decided to camp the whole time. But it does give us something to talk about every year on our anniversary - the fact that it flooded in the camp ground we stayed at, and because of the flooding no one could get in or out of the town, and then the power went out. And we were in a tiny backpacking tent, with no form of entertainment in the town except for walking from one end of town to the other. Ah, the memories. (sorry for the in-depth honeymoon trip, but our 5-year anniversary is today, so it's the perfect time to wax nostalgic and go through all of our honeymoon and/or wedding photos)
But I digress.
Back in 2008, when Shawn had to go on a recruitment trip for his at-the-time employer to our alma mater, I decided to tag along. There aren't many places prettier than the CU campus in early October (in my opinion, but then, I may be biased). I spent my days hanging out at Varsity Pond taking pictures and counting turtles.
 Varsity Pond, University of Colorado at Boulder Campus, Boulder, Colorado.
And just on the other side of this pond, in one of the flower beds, I found this, my entry for the August Gardening Gone Wild Picture This photo contest:

Friday, August 13, 2010
Horny Fly?
 I keep thinking of the 'There's a lady who swallowed a fly' song whenever I see this photo.
I've discovered that each of my pepper plants has one tomato horn worm on it, and each of my tomato plants is horn worm free. Odd, that.
Sunday, August 8, 2010
Science Experiment Updates
An update from my post on June 6, 2010:
- The Garlic Experiment (aka Growing Garlic) - Win!
- Make seed start pots out of toilet paper rolls - Fail. I will try this again soon. I've just been lazy.
- Strawberry Popcorn - Neutral. The corn grew, it produced. Because of my own stupidity, they didn't produce as much as they could have. I planted I think 8 plants or so and got 6 good ears and about that many not good ears (I had stopped watering the plants well before I should have).
- Paper towel seed starting technique - Epic Win! I successfully managed to start 5-year old basil and black eyed susan seeds using the trick of sprinkling seeds on a wet paper towel, wrapping it up and putting it in a ziplock bag on the counter. The basil is still alive (the black eyed susans all died after I planted them). I also started swamp milkweed and butterfly weed (both from my own plant and from seeds I bought) by this method. I was successful enough that I gave away 2 swamp milkweeds and 3 butterfly weeds. The least successful was the butterfly weed seeds that I bought (only 1 survived and it's still just an inch tall or so). I haven't started any other seeds this way recently, but you better believe that I will.
- Lemon Balm + Nasturtium to repel Squash Vine Borer - Neutral. I don't know if it really repels the SVB, but I'll probably plant this again as the Nasturtiums are pretty and the Lemon Balm is well, lemony. I love lemony things. As mentioned earlier, when the lemon balm is crushed and rubbed on exposed skin it works as a decent mosquito repellent (for me and the hubby at least, I don't know if anyone else has tried this so I can't tell you if it works for everyone).
- Quinoa - Has not started yet. This will be the fall garden experiment.
- Starting tomatoes/eggplant/pepper from seed - Epic Win! I got a handful of tomatoes from the green zebras and there are 2 eggplants on the Beatrice. I have yet to get peppers, but I blame the heat.
New!
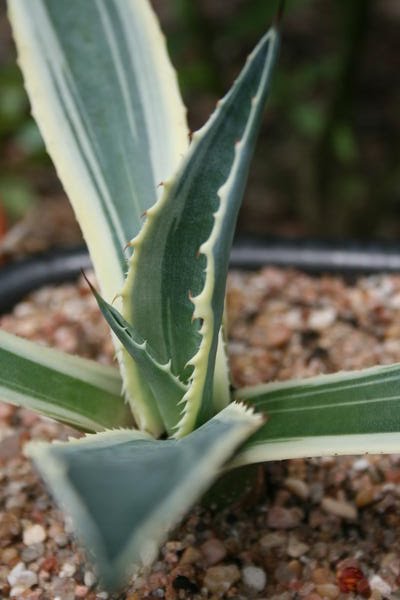
- Agave pups - In process. the agave plant at work sent up a bloom stalk and is dying so I took a handful of pups and have them sitting in a sand/soil mix at work. About half seem to be doing alright, the other half, not so much. The other people at work who took pups and put them in a pot with dirt right away seem to be having quite healthy looking cacti. I will pot mine up soon and bring them home for planting...somewhere...I'm not sure where yet.
- Pumpkins - Has not started yet. This will be a spring 2011 garden experiment. If it works out, we'll have white pumpkins for Halloween. I will draw Casper the Ghost on every one of them, too.
- Carnival Mix Carrots - Has not started yet. This will be a fall 2010 garden experiment. I believe I've read somewhere that people haven't liked this variety as much as some other single color varieties.
- Chef's Choice Cauliflower Mix - In process...sort of. This will be a fall 2010 garden experiment. White, green and purple variety cauliflowers...which reminds me, I should probably start more seedlings since the last ones are all bent funny.
- Tulle Bags to protect the tomatoes - Has not started yet. I'll make the call when I have more tomatoes growing and if there are still lots of stink bugs around. The gist is that you use those little tulle wedding gift bags and put your tomatoes in them (while still on the plant, duh), to protect the tomato itself from bugs. Note: As Annie in Austin has pointed out, this will not protect your tomatoes from other, larger varmints. Varmints with teeth.
- Potato box - This will be starting shortly since it is Fall Potato Planting Season now. I just need to convince the hubby that he loves me enough to go buy lumber and build this box thingy.
So, if you have any experiments ideas, let me know and I'll see if I can squeeze them in.
- The Garlic Experiment (aka Growing Garlic) - Win!
- Make seed start pots out of toilet paper rolls - Fail. I will try this again soon. I've just been lazy.
- Strawberry Popcorn - Neutral. The corn grew, it produced. Because of my own stupidity, they didn't produce as much as they could have. I planted I think 8 plants or so and got 6 good ears and about that many not good ears (I had stopped watering the plants well before I should have).
- Paper towel seed starting technique - Epic Win! I successfully managed to start 5-year old basil and black eyed susan seeds using the trick of sprinkling seeds on a wet paper towel, wrapping it up and putting it in a ziplock bag on the counter. The basil is still alive (the black eyed susans all died after I planted them). I also started swamp milkweed and butterfly weed (both from my own plant and from seeds I bought) by this method. I was successful enough that I gave away 2 swamp milkweeds and 3 butterfly weeds. The least successful was the butterfly weed seeds that I bought (only 1 survived and it's still just an inch tall or so). I haven't started any other seeds this way recently, but you better believe that I will.
- Lemon Balm + Nasturtium to repel Squash Vine Borer - Neutral. I don't know if it really repels the SVB, but I'll probably plant this again as the Nasturtiums are pretty and the Lemon Balm is well, lemony. I love lemony things. As mentioned earlier, when the lemon balm is crushed and rubbed on exposed skin it works as a decent mosquito repellent (for me and the hubby at least, I don't know if anyone else has tried this so I can't tell you if it works for everyone).
- Quinoa - Has not started yet. This will be the fall garden experiment.
- Starting tomatoes/eggplant/pepper from seed - Epic Win! I got a handful of tomatoes from the green zebras and there are 2 eggplants on the Beatrice. I have yet to get peppers, but I blame the heat.
New!
- Agave pups - In process. the agave plant at work sent up a bloom stalk and is dying so I took a handful of pups and have them sitting in a sand/soil mix at work. About half seem to be doing alright, the other half, not so much. The other people at work who took pups and put them in a pot with dirt right away seem to be having quite healthy looking cacti. I will pot mine up soon and bring them home for planting...somewhere...I'm not sure where yet.
- Pumpkins - Has not started yet. This will be a spring 2011 garden experiment. If it works out, we'll have white pumpkins for Halloween. I will draw Casper the Ghost on every one of them, too.
- Carnival Mix Carrots - Has not started yet. This will be a fall 2010 garden experiment. I believe I've read somewhere that people haven't liked this variety as much as some other single color varieties.
- Chef's Choice Cauliflower Mix - In process...sort of. This will be a fall 2010 garden experiment. White, green and purple variety cauliflowers...which reminds me, I should probably start more seedlings since the last ones are all bent funny.
- Tulle Bags to protect the tomatoes - Has not started yet. I'll make the call when I have more tomatoes growing and if there are still lots of stink bugs around. The gist is that you use those little tulle wedding gift bags and put your tomatoes in them (while still on the plant, duh), to protect the tomato itself from bugs. Note: As Annie in Austin has pointed out, this will not protect your tomatoes from other, larger varmints. Varmints with teeth.
- Potato box - This will be starting shortly since it is Fall Potato Planting Season now. I just need to convince the hubby that he loves me enough to go buy lumber and build this box thingy.
So, if you have any experiments ideas, let me know and I'll see if I can squeeze them in.
You gotta watch your melons...
As I tweeted a while back, the ONE watermelon I had was eaten by the opossums or the raccoons. Around that time, I noticed that there was a cantaloupe on a vine that had started climbing the tomato cage. After it was heavy enough, it pulled the vines down and was growing behind the garden bed. I figured at that point that I'd better reach over and actually put it inside the garden otherwise I'd forget about it. In my haste to wait until it was good and ripe, I let it get overripe and the bugs ended up eating it (earwigs, specifically). I tasted a small bit today that wasn't eaten by the bugs and it was pretty bland--it did taste like cantaloupe, but not very sweet cantaloupe.
So, there you go, 1 watermelon eaten by varmints, and 1 cantaloupe eaten by bugs.
Last night I noticed another watermelon growing, and considering that it was the size of the last watermelon before I even noticed it, hopefully that means that the varmints won't notice it either. fingers crossed!
In other planting news, I planted the aforementioned zucchini and yellow squash seeds in the garden. Of all the seeds I planted, I've noticed 3 spots where the squash has come up (and the odd thing is that in these three piles, all the seeds have sprouted, and in the other piles none of the seeds have sprouted). This most likely means that the squash are all the same variety, which, meh, whatever, the point was to get something in the garden that will cover the dirt. I thinned the squash to 2 plants per location, so hopefully they appreciate that rather than 5 plants per spot.
Wednesday, August 4, 2010


Thursday, July 29, 2010
Gardening Gone Wild October Photo Contest.
Heads up everyone: Gardening Gone Wild's photo competition for October is one that you can start on now--it's all about creating a photo by putting things on your scanner bed and then scanning them to make a picture. YEAH...they explain it much better on their website here: http://www.gardeninggonewild.com/?p=12809
Monday, July 26, 2010
Maintenance
I pulled out 5 of the 8 tomato plants (the Lemon Boy, Green Zebras, and one of the cherry tomatoes had to go). They were looking mighty sorry and the leaf footed bugs and stink bugs were going after all the fruit--the tomato plants that are staying look pretty healthy and only had 1 tomato between the three of them, a tomato which I went and picked today even though it's not completely ripe yet--I just couldn't bear to let the stink bugs get the ONLY Ananas Noire tomato I had.
I was going to plant the other green zebra and Ananas Noire cutting I had in their place, but now I'm re-thinking it. I'll probably still plant the Ananas Noire because I have it, but I will just give the rest of the green zebras away.
Instead I think I'll plant the ancient zucchini and yellow squash seeds I have--if they don't come up, not that big of a deal since I wasn't planning on planting summer squash, and if they do then maybe we'll have some summer squash.
Saturday, July 24, 2010
Yellow Garden Spider Updated photo

Here's a photo taken maybe three days later. I swear she's gotten bigger. I've already posted this same picture and gave a small write up on my normal blog here
Thursday, July 22, 2010

Tuesday, July 20, 2010

Monday, July 19, 2010
Weather Forecast: It's Hot.
It's hot outside. my tomatoes are under attack of the dreaded Stink Bugs. I'll be ripping them out soon--the plants look too far gone to try to save for the fall (except for the Ananas Noir and Purple Cherokee...this could be because they have produced naught but one tomato between the two of them). Instead I'll be planting some transplants, probably a green zebra and a cutting from the Ananas Noir.
Otherwise everything is doing okay. The eggplant is good, the squash are good, the parsley and lemon balm are great. I started some broccoli and cauliflower for the fall but the seedlings were attacked by snails or something so I don't know if any will pull through.
The society garlic and rock rose seem to love this weather (of course they also get afternoon shade), both turk's cap plants in the back are blooming, and I've discovered that in addition to moving one of the passionvines this fall, I'll also have to switch the cast iron plant and the giant petunias--the cast iron is in a spot that I was sure got shade but apparently is actually quite sunny (don't get me wrong, they're doing well there, it's just that the petunias would probably benefit more from the sun than the cast iron plant). The butterflyweed is a breeding ground for aphids...but I did see my first monarch on the plant the other day (it was either male, or it's not breeding season yet).
Wednesday, July 14, 2010
Sunday, July 11, 2010

Wednesday, July 7, 2010

Monday, July 5, 2010
Butterfly Weed: Part III

They warned me this would happen (aphids on butterfly weed). Still, it ain't pretty.
OMG! I HAVE FINALLY FOUND A CHRYSALIS!
 I was going to make some dill dinner rolls today, but opted against it when I got out there and saw all this.
But I also saw this:

I shall name him/her Billy.
Billy turned into this a few hours later:

And I finally found the one that I thought I saw getting ready to pupate last week. I shall name this one George. George is the lighter green 'leaf' in the center of the picture.

Best of luck little buddies. Hopefully this turns out better than the last chrysalis I found.
Sunday, July 4, 2010
Tomato Plants (for Fall Planting)
 Even if none of these survive, I say it's still a success. I started the seeds in an old blueberry container and then, when the plants were larger, I separated them and planted them in their own containers. There are three brandywine in the front and the rest are green zebras.
Now then, who wants a tomato seedling for fall planting?
Cucumber melon
My husband keeps seeing this and exclaiming that I have a watermelon growing.

I have to keep informing him that it is not a watermelon but a cucumber.
I can see how he'd be confused since this cucumber is very globe-like and not cucumber-like.

But I do have a watermelon this year, it is about the same size, and is protected from being run over by the lawn mower by the bucket I have the dill growing in and the planter I have the peppers growing in.

Saturday, July 3, 2010
Weed or Flower?
I have quite a few plants that some would consider weeds. Some (like the horse herb), my husband considers weeds, and some (like the Asian jasmine) I consider weeds and some, like the spiderwort that Bob accidentally gave me when he dug up one of his giant petunias, are considered weeds by one, and precious flowers by another.
I've identified horse herb and frog fruit in my yard (both considered weeds by the husband). We obviously have a ton of Asian jasmine and it takes over EVERYTHING, thus it is a weed. The spiderwort is not yet considered a weed by us. Claude helped identify vetch, which I considered a weed. I don't think the husband considered it a weed until it started growing in the lawn.
But, what I can't figure out is whether this is a weed or not:

I mean it's a plant that I didn't plant and most of the time it looks pretty weed-like. But then it flowers with these actually quite large (relatively) and pretty (relatively) purple flowers. Very petunia-esque.
I've also found some type of Iris in this corner of the yard (by the cable box electrical doohickey thingamabopper), I should probably dig that up and put it where it will get sun so I can find out if I want to keep it or not...
Thursday, July 1, 2010
Nasturtiums
I planted the nasturtiums this year as a barrier to the SVB. I don't know if worked as I think all of my squash plants ended up with borers. BUT they do compensate by flowering for me. In Colorado I think I grew these once and they never bloomed (much like the morning glory and the moon flower). It probably had something to do with MiracleGro.
The variety I got was the Alaskan Variegated (I think) from Gardens before they closed.
The most prolific color is the Orange color:

But my favorite is a toss up between the Cream and the Red (in picture form, I prefer the red, but I think in real life I like the cream better):


The variety I got was the Alaskan Variegated (I think) from Gardens before they closed.
The most prolific color is the Orange color:

But my favorite is a toss up between the Cream and the Red (in picture form, I prefer the red, but I think in real life I like the cream better):


Wednesday, June 30, 2010
Moths, Butterflies, and larva
 Horace's Duskywing (Erynnis horatius)
 Gulf Fritillary larva (Aqraulis vanillae) Purple Morph. This guy started the chrysalis stage later in the day. Also, apparently the purple morph is common in Texas but less so outside of the state.
 Saltmarsh Moth larva (Estigmene acrea) I also have these guys in abundance in the black and the blond/black variations. As if the squash-type plants didn't already have enough problems with the SVB, these guys seem very particular to the squash and watermelon plants.
 Bordered Patch Butterfly (Chlosyne lacinia)
Subscribe to:
Posts (Atom)