As I had approximately 8 gabillion basil plants this year, I decided that I really needed to try to do SOMETHING to preserve as much basil as possible for later use. Generally speaking, the options are freezing and drying (but oddly not freeze drying...but that may be because it requires some equipment that I don't have).
So, first, we will talk about the Drying methods:
Drying is easy to do. I had been using the dehydrator I got as a Christmas present about 10 years ago, but that still requires electricity, time, and precious counter space. Even though the dehydrator information manual tells me that basil should only take like a day or two to dry out, I've noticed that it takes longer than that--stupid humidity. So I usually let it run about a week. The biggest problem with this method is that I'm limited by the size of the dehydrator, and it takes time to pick all the basil leaves, wash them, and arrange them on the drying racks. Which brings me to drying option number 2: the hanging hook. The hanging hook is one of those hook things in the ceiling--I believe the previous owners used it for a hanging plant of some sort.
 entire basil plant hanging from the hanging hook.
I use it as a place to dry all of my stuff that needs to dry before storage--onions, garlic, oregano, basil, etc. Obviously this method also has its benefits and drawbacks. Benefits: it doesn't take up counter space, it doesn't use electricity, it gets the job done, and the prep is quicker--cut off the plant at the ground, spray down with a hose, pick off all the icky leaves, use twine to tie it up to the hook. Drawback: its in my kitchen and its set up in a way that as soon as you walk in the front door you can see it hanging there.
And now we move onto the Freezing methods:
Quite honestly this will be the first year that I've done freezing of basil--it never crossed my mind prior to making spaghetti sauce from a recipe my friend
Kristie gave me [note: the entry I linked to is one pretty benign, but if you read any of Kristie's other entries, I warn you now that if you have delicate sensibilities, you might get offended... she's hysterical, but still, you've been warned.]--the recipe made so much I ended up putting most of it in empty spaghetti sauce jars and then we had to eat spaghetti for 8 of the next 14 nights. And that's when Kristie told me that I could have just put the sauce in Ziploc bags and put them in the freezer. When I mentioned this to one of my other friends, she said that she normally would make pesto and then freeze it in ice-cube trays since one cube made about one serving of pesto for her. And that's when it dawned on me that while I didn't like pesto I could still do the same process with just plain basil.
Now then, I've heard of using both water and oil (never together) as the liquid for this, and I figure either will work; in fact Iris over at
Society Garlic uses water instead of oil and she also has a comprehensive 'how to' on her blog. Depending on how much water you add, you may have to take that into account when adding it to your sauce, and this is probably more of a problem if you're using whole basil leaves instead of the mushed up variety like I am. Obviously if you're going to do this for pesto, you should just use the oil since I believe that's added to pesto anyway.
I worked on this throughout the day and finally came up with the quickest way to do it.
The steps are thusly:
- cut down a basil plant to the ground (this is because I'm trying to clear out basil plants so I can plant the fall garden, otherwise you can just pull stems off as you normally would).
- Spray down with a hose.
- Swing the plant around violently to try to get as much water as possible off of the leaves. Seriously--pretend you're a Jedi.
- Get a giant bowl and then pick off all the good leaves (no yellow or bug-befouled leaves) and put them in the bowl.
- Once you've cleared the plant of good leaves, or filled the bowl, whichever comes first, get out your food processor and put a bunch of leaves in it. (the picture below is before I started pulling off the good leaves and putting them in the bowl and instead I was pulling off stems and then pulling off leaves and putting them directly into the food processor. So much more time)

- Turn it on, as it's whirling away, drizzle olive oil into the top (generally I used about 2T per initial filled processor, then I'd add more as needed, but I doubt I used more than 4T per batch, and this time I made 4 batches)
- If it seems as if the bottom leaves are getting chopped but the top ones aren't, turn off the processor and use a spatula to move everything around. Turn the processor back on and hopefully it will start chopping the top leaves.
- Add more leaves through the top hole, and add olive oil to keep everything lubricated.
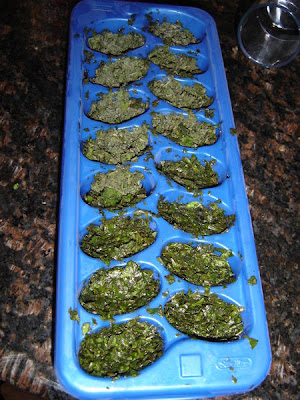
- When the processor is full of chopped basil (or you're out of basil to add), turn off the processor and scoop all the good chopped basil into clean, empty ice cube trays. (the ones at the top of the picture are already partially frozen, and the ones at the bottom were just scooped into the tray).
- Freeze
- Turn out basil cubes and place them in clearly marked Ziploc bags in the freezer.
- Use as desired.
I have found that the size of cube I make can make a double batch of spaghetti sauce, being spiced to my preference. Also, the plant I used was massive, and made 32 cubes. My friend from work also used one of her plants (which was much smaller) and it only made 4 cubes. Now then, on to the remaining 7 gabillion basil plants...
 showing the potatoes growing, and after adding mulch--they're all growing toward the north (I think it's because I have an ash tree to the south so it seems, to the plants, that the strongest light is north). Please disregard my giant bucket of stuff that needs to go in the compost bin that's in the background.


